
|
Tips and Techniques - Make your C to C Roll Snap |
The kayak roll is one of the best forms of self rescue a kayaker can have. Whether you should learn to do a Sweep Roll, C to C Roll or an Extended Paddle Sweep Roll, depends upon your boat, your paddle and your body type. While the C to C requires a bit more range of motion than the sweep, it is a dynamic and effective roll . Below are some tips to get you doing those 360 degree turns.
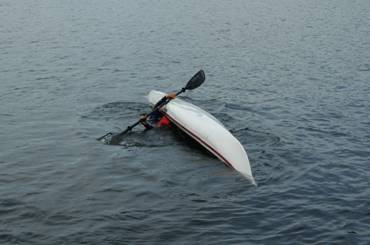
PICTURE 1:
To set up for the roll:
**Reach up, along the side of your kayak, as high as you can with your hands. Your knuckles should feel the air.
**Avoid bending too far forward. Think lateral - wrap your body around the boat

PICTURE 2:
As you move your paddle into position:
**Think of moving the back hand more than your front hand.
** Place your back hand on the center of the boat’s hull. (Lay it flat right over the center of your buttocks).
**Wrap your body around the boat (spine should be in a C position).

PICTURE 3:
** Front hand should move, not out, but up to the surface and 90 degrees to the hull.
**Upper body should be floating on or just below the surface of the water.

PICTURE 4:
Before engaging your lower body make sure you are in the proper position:
**Body is close to the surface and wrapped around the boat in a C position
**Back hand is over the center of the hull.
**The leading (onside) hand is up on the surface.
**Paddle blade is 90 degrees to hull with power face on the water (high brace position).
PICTURE 5:
Once everything is in place, activate your lower body:
**Legs, Hips, Obliques….Action. Lift with your onside leg and hip and contract your onside obliques.
Bob and Karen trust WebDesignByJason.com to create and maintain this site |
**Your body should be now forming a C in the opposite direction from which you started.

PICTURE 6:
**The hip snap is done from side to side, not by bending forward
(Imagine your are sideways in a very narrow hallway with your nose on one wall and your back on the other. You can only move from side to side, not by bending forward or backwards)
**The back elbow (offside) stays low. It moves from the center of the hull directly to your offside rib cage.
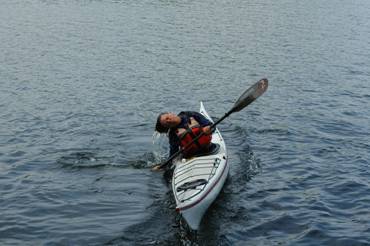
PICTURE 7:
**The last thing that comes up is your head.
**Keep your upper body floating on the surface as long as you can.
**Stack one vertebra at a time, working from the lower body to the upper body. Visualizing a “slinky” like motion seems to help me.